
How to Add Exit Intent Popups to WordPress (7 Best Plugins + Setup Guide)
Learn how to set up exit intent popups on WordPress with current 2025 plugin pricing, step-by-step setup guide, and research-backed best practices for converting abandoning visitors.
With around 70% of online shopping carts abandoned before checkout (Baymard Institute), every visitor who leaves your WordPress site without converting represents lost revenue. offer a way to recover some of those visitors.
Research based on over 1 billion popup displays shows exit popups typically convert 2-4% of abandoning visitors (Wisepops). For cart abandonment scenarios specifically, that number jumps to 17.12% according to OptiMonk's data.
This guide walks you through setting up exit intent popups on WordPress, compares the best plugins for 2025 with current pricing, and covers the practices that separate high-converting popups from those visitors dismiss immediately.
Note: This guide focuses on exit intent popups for WordPress sites. The benchmarks and tactics apply specifically to exit-, not general popup strategies.
What Is an Exit Intent Popup?
An exit intent popup appears when a visitor shows signs of leaving your website. The technology monitors mouse movement and triggers the popup when the cursor moves toward the browser's close button, back button, or address bar.
How exit intent detection works:
- JavaScript tracks cursor position on the page
- When the cursor moves above the viewport toward browser controls, the script triggers
- The popup displays before the visitor clicks away
- A cookie prevents the same visitor from seeing it repeatedly
On desktop, this detection is reliable because mouse movement clearly indicates intent to leave. Mobile devices use different signals since there's no cursor to track. Instead, mobile exit intent relies on rapid scroll-up gestures, tab switching, back button presses, or tapping the address bar.
Why Exit Intent Popups Matter for E-Commerce
Every visitor who leaves without converting cost money to acquire. Exit popups provide a second chance to capture value from that traffic before it's gone.
Key statistics:
| Metric | Value | Source |
|---|---|---|
| Average cart abandonment rate | ~70% | Baymard Institute |
| Exit popup conversion rate (average) | 2-4% | Wisepops |
| Cart abandonment popup conversion | 17.12% | OptiMonk |
| Visitors saved by exit popups | up to 15% | Picreel |
| Email subscribers with discount offer | up to 7% | Picreel |
Cart abandonment popups perform particularly well because they target visitors who already showed purchase intent. Something stopped them from completing checkout, and a well-timed incentive can remove that friction.
Want to see what abandoned carts might be costing your store? Use a cart abandonment calculator to estimate your potential recovery.
Common Use Cases
Cart abandonment recovery: Show a discount code or free shipping offer to visitors leaving with items in their cart. The 17.12% for this scenario reflects how effective targeted offers can be.
Email list building: Offer a lead magnet or first-purchase discount in exchange for email signup. Data suggests you can convert up to 7% of abandoning visitors into subscribers with a compelling offer.
Product recommendations: Display before visitors leave category pages. This works when visitors didn't find exactly what they wanted but might be interested in alternatives.
Feedback collection: Ask why the visitor is leaving. This feedback helps identify friction points worth addressing.
Best Exit Intent Popup Plugins for WordPress (2025)
WordPress has dozens of popup plugins. Here are the best options for exit intent functionality, with current pricing.
1. OptinMonster
Best for: Marketers who need advanced targeting and
OptinMonster is considered one of the most feature-rich exit popup solutions for WordPress. It offers extensive templates, page-level targeting, and detailed conversion analytics.
Key features:
- Page-level and device-specific targeting
- Built-in A/B testing
- Integration with major email platforms
- Exit intent + scroll + time triggers
- MonsterLinks (click-triggered popups)
Pricing: From $7/month (Basic) to $49/month (Growth). Exit intent requires Pro plan ($29/month) or higher.
2. Picreel
Best for: Sites wanting a free plan with room to grow
Picreel offers a forever free plan for up to 5,000 visitors monthly, making it accessible for smaller sites testing exit popups.
Key features:
- Free plan available
- AI-powered popup recommendations
- Exit intent and scroll triggers
- A/B testing
- Email integrations
Pricing: Free (up to 5k visitors), paid plans from $9.99/month.
3. Popupsmart
Best for: Beginners wanting a simple, modern popup builder
Popupsmart offers a free plan to get started and a clean no-code builder. The free plan is limited to 1 popup and 1 website, but it's enough to test exit intent functionality.
Key features:
- Free plan available (1 popup, 1 website)
- Smart targeting options
- Modern templates
- No-code builder
- Exit intent on free plan
Pricing: Free plan (5k pageviews, 1 popup, 1 website), Basic from $39/month (50k pageviews, 3 websites, unlimited popups).
4. Popup Maker
Best for: WordPress purists who prefer native plugins
Popup Maker is one of the most popular free popup plugins on wordpress.org. The core plugin is free and includes basic triggers. Exit Intent and other advanced triggers require the Pro plan.
Key features:
- Free core plugin
- Extensive trigger options
- WooCommerce conditions
- Cookie settings for display control
- WordPress-native solution
Pricing: Free core, Pro from $59/year first year, then $99/year (includes Exit Intent trigger and all premium features).
5. Thrive Leads
Best for: Thrive Suite users who want full integration
Part of the Thrive Suite, Thrive Leads integrates with other Thrive tools for a cohesive marketing stack.
Key features:
- Multiple form types
- Advanced targeting
- Detailed reporting
- Full Thrive ecosystem integration
- A/B testing engine
Pricing: $99/year standalone or included in Thrive Suite at $299/year (all 8 Thrive plugins, up to 5 websites).
6. Ninja Popups
Best for: Budget-conscious users preferring one-time payment
Ninja Popups offers a one-time purchase option, avoiding recurring subscription costs.
Key features:
- One-time purchase
- 65+ themes included
- Exit intent trigger
- Social locker feature
- Email integrations
Pricing: $24 one-time purchase.
7. Elementor Popup Builder
Best for: Elementor users who want design flexibility
If you build pages with Elementor, the Popup Builder uses the same drag-and-drop interface for creating exit popups.
Key features:
- Full Elementor design capabilities
- Exit intent trigger
- Condition-based display rules
- Template library
- Form integration
Pricing: Requires Elementor Pro Advanced plan ($99/year for 1 site). The Essential plan ($59/year) does not include Popup Builder.
Plugin Comparison Table
| Plugin | Free Exit Intent | Starting Price | Best Feature |
|---|---|---|---|
| OptinMonster | No | $29/month Pro | Advanced targeting |
| Picreel | Yes (5k visitors) | Free | AI recommendations |
| Popupsmart | Yes (5k pageviews) | Free | Simple no-code builder |
| Popup Maker | No | $59/year Pro | WordPress-native |
| Thrive Leads | No | $99/year | Thrive integration |
| Ninja Popups | No | $24 one-time | No subscription |
| Elementor | No | $99/year Advanced | Design freedom |
Pricing verified December 2025. Check plugin websites for current rates.
How to Set Up an Exit Intent Popup on WordPress (Free)
Here's a step-by-step process using Popupsmart, which offers free exit intent popups on their free plan. Unlike OptinMonster (which requires the $29/month Pro plan for exit intent), Popupsmart lets you test exit popups without any upfront cost.
Free plan limitations: The free plan includes 5,000 monthly pageviews, but is limited to 1 popup and 1 website. This is enough to follow this tutorial and test exit intent functionality. For multiple popups or websites, paid plans start at $39/month.
Popupsmart offers two integration methods: a WordPress plugin (easier) or manual JavaScript installation.
Step 1: Create a Popupsmart Account
Go to Popupsmart.com and sign up for a free account. The free plan includes exit intent triggers with up to 5,000 monthly pageviews.
After signing up, you'll see the Campaign Builder screen with "Let's create your first campaign!" prompt.
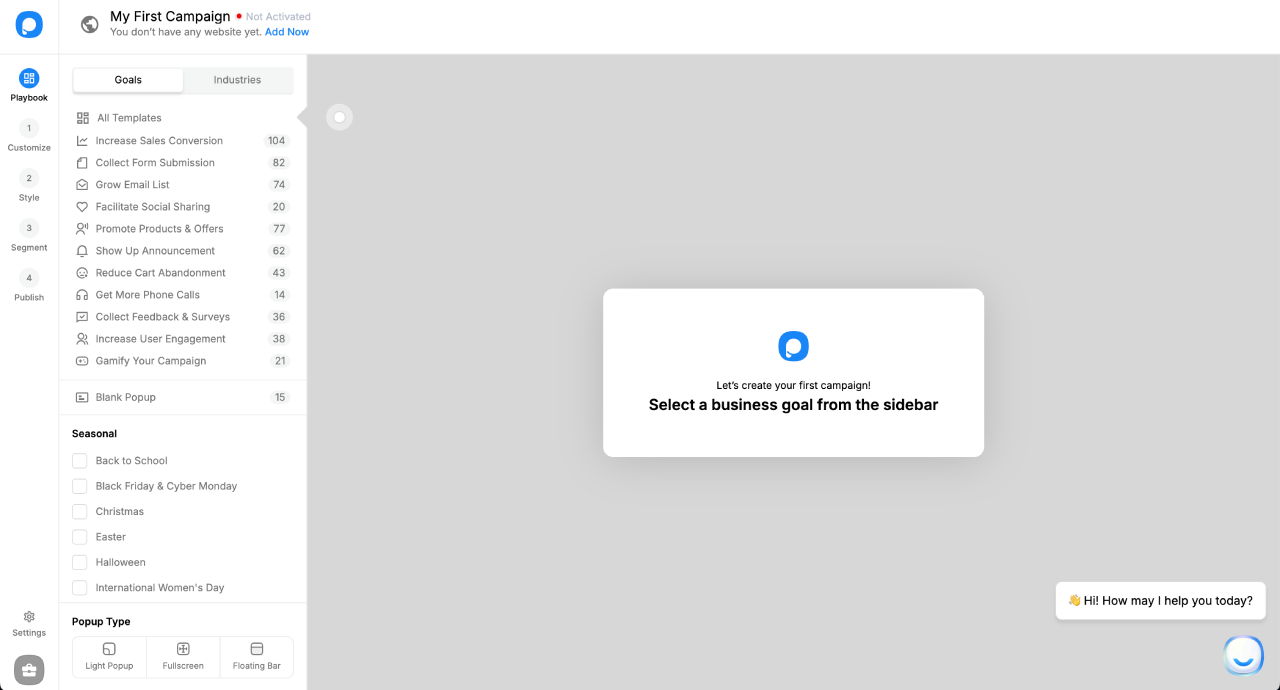
Note: For new users, Popupsmart automatically opens the campaign builder right after signup. You'll connect your WordPress site later in Step 6 when publishing.
Step 2: Choose Your Exit Intent Template
In the campaign builder, you'll see a Goals tab with pre-built template categories. Select a goal like "Increase Sales Conversion" to see relevant templates, or click "All Templates" and search for "exit" to find exit intent-specific templates.
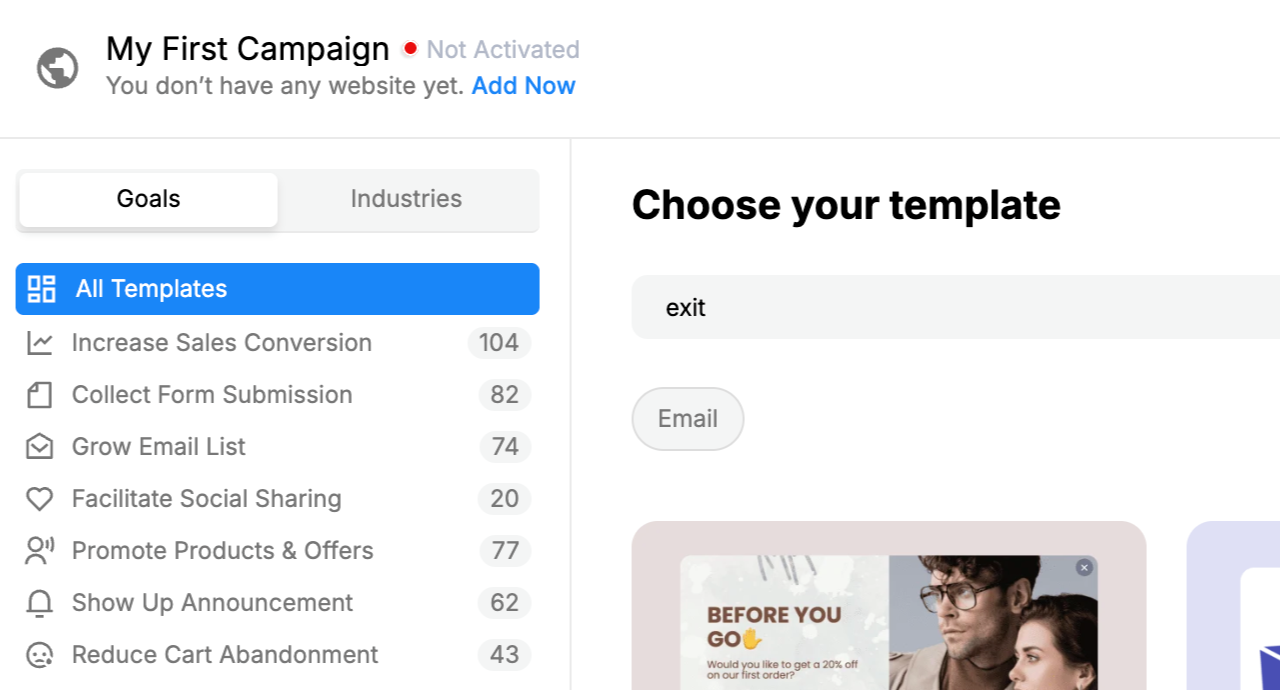
You'll see 8+ exit intent templates designed for different goals:
- Discount offers for cart recovery
- Email capture for list building
- Free shipping promotions
- Last-chance offers
For cart abandonment recovery, select a template with countdown timer support - drives faster decisions. We recommend "Exit-intent Triggered Popup with a Discount Offer" as a starting point.
Step 3: Customize Your Popup Content
After selecting a template, you'll enter the Customize step where you can edit every element of your popup.
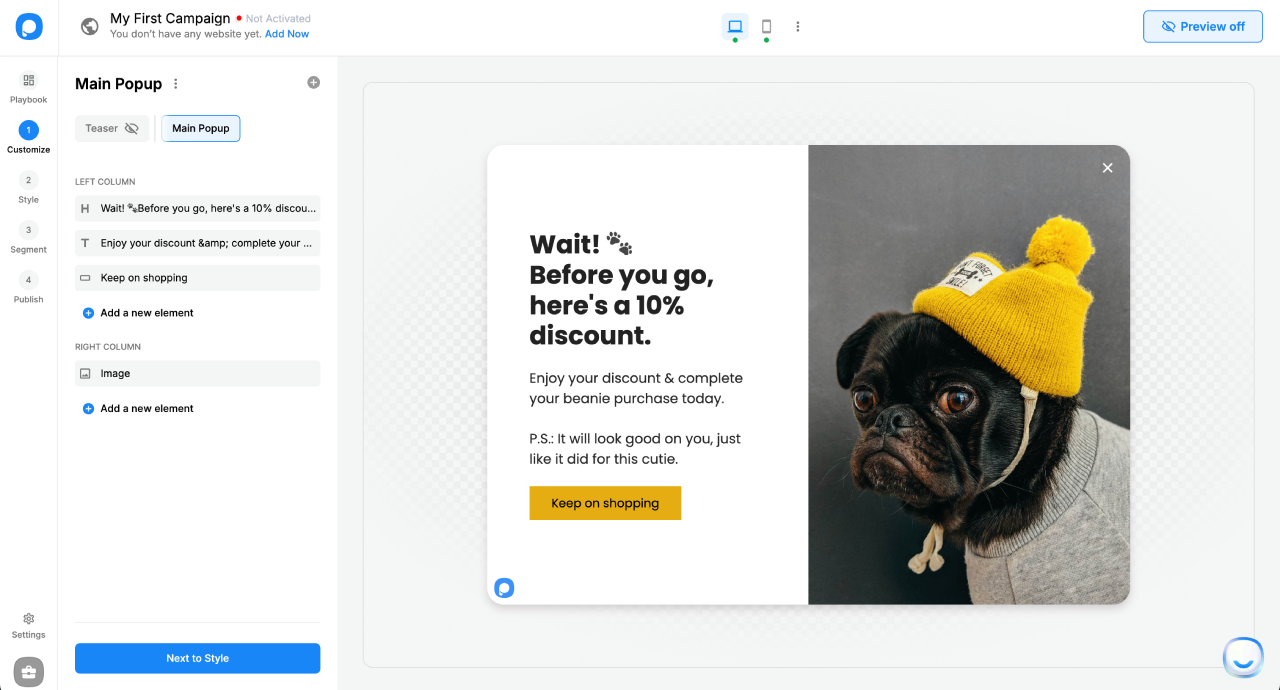
Adding new elements:
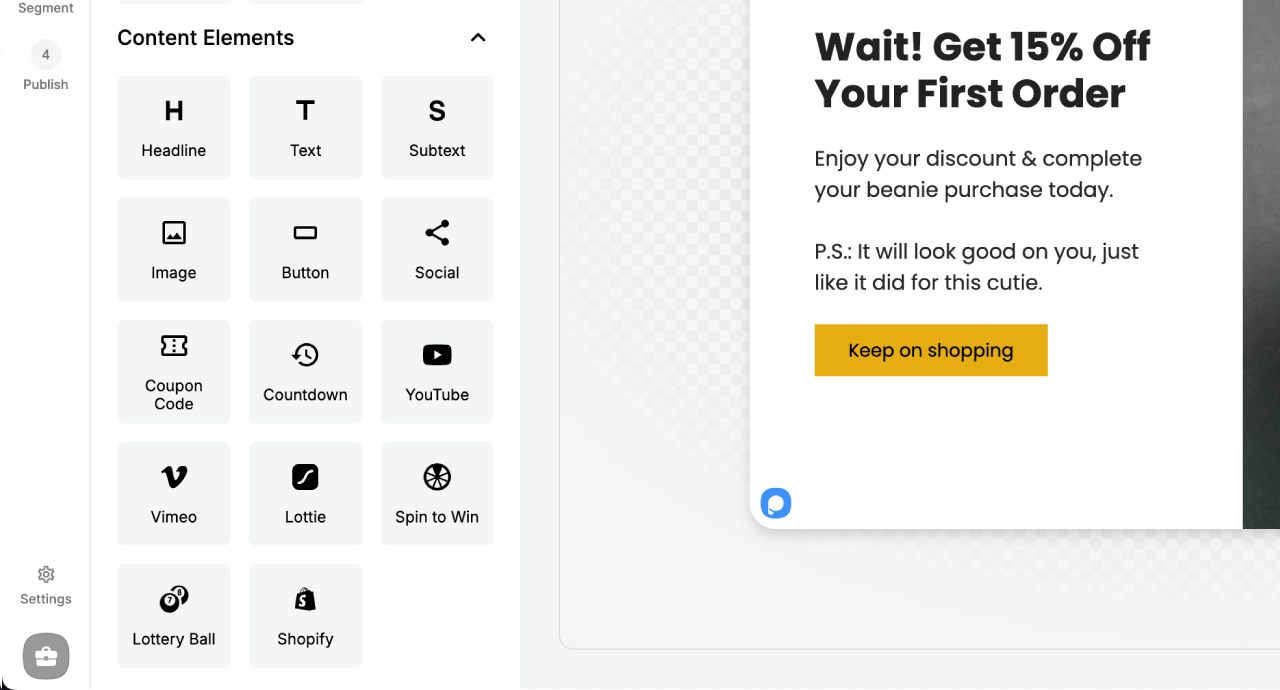
Click Add a new element to open the elements panel, which is divided into two sections:
Form Elements (for collecting user data):
- Email, Phone, Full Name
- Rating, Dropdown
- And more
Content Elements (for display):
- Headline, Text, Button
- Image, Countdown Timer
- Coupon Code
- And more
Recommended popup content for cart abandonment:
Based on conversion research, here's an effective exit popup configuration:
| Element | Recommended Content |
|---|---|
| Headline | Wait! Here's 10% Off Your First Order |
| Text | Offer expires in: |
| Countdown | 12:58 (or your preferred duration) |
| Text below countdown | Use this code at checkout before time runs out: |
| Coupon Code | SAVE10 |
| Button | Continue Shopping |
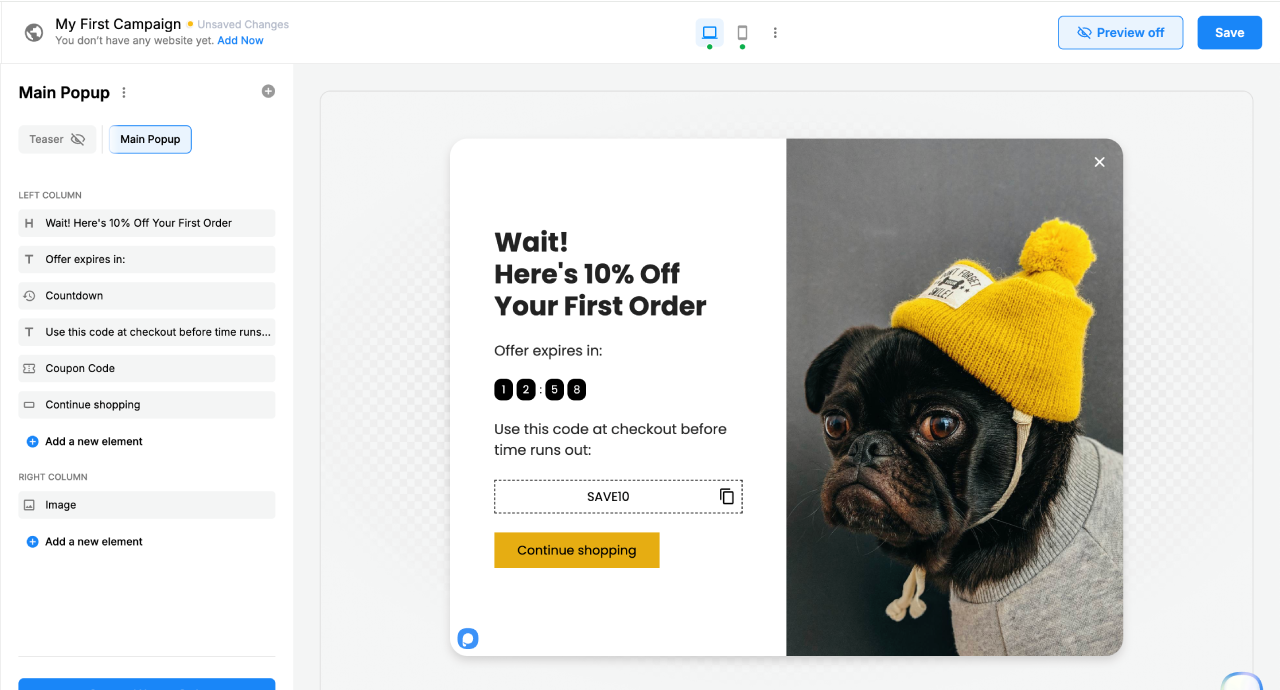
Why this configuration works:
- Urgency headline ("Wait!") captures attention immediately
- Specific discount (10%) matches the most common e-commerce offer
- Countdown timer increases urgency - popups with timers average 14.41% conversion vs 9.86% without
- Visible coupon code removes friction (visitors can copy immediately, no need to check email)
- Positive ("Continue Shopping" vs "Close") encourages action
Important: Before publishing, create the matching coupon code in WooCommerce (Marketing > Coupons > Add New) with the same code you use in the popup.
Step 4: Configure Popup Style
Click Next to Style to customize the visual appearance of your popup.
Key style settings:
Overlay settings (recommended):
- Enable the background overlay to focus attention on the popup
- Set overlay opacity to 50% - dark enough to draw focus, light enough to show the page behind
- This creates a "modal" effect that increases popup visibility
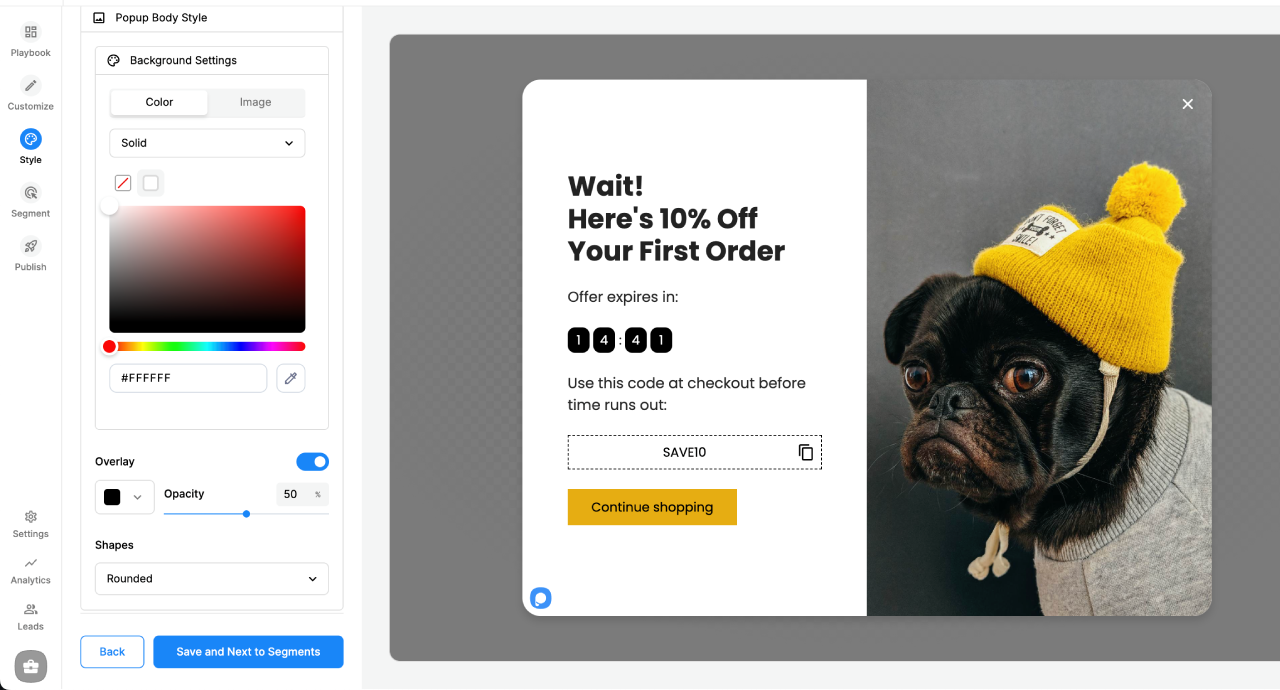
Other style options:
- Popup body style (colors, borders, shadows)
- Font settings
- Button colors (match your brand)
- Countdown timer styling
- Spacing and alignment
Pro tip: Adjust button and countdown timer colors to match your brand colors for a consistent experience.
Step 5: Configure Exit Intent Trigger and Targeting
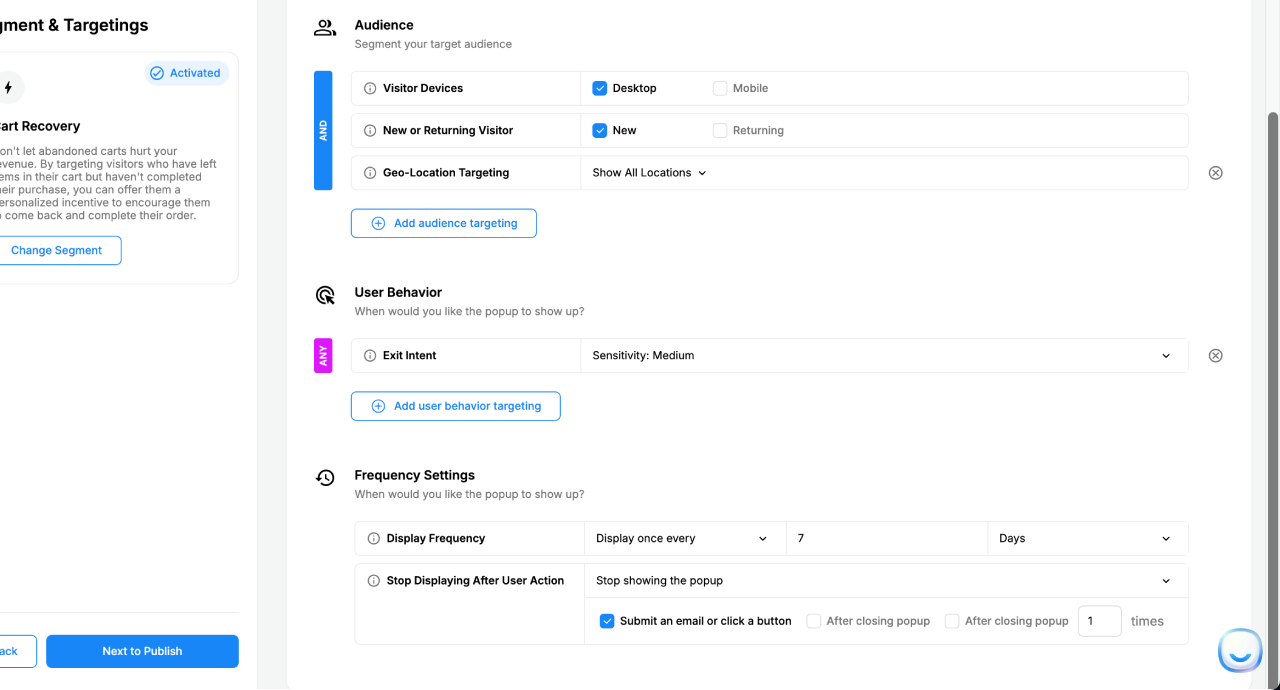
Click Next to Segments to access the three key configuration sections: Audience, User Behavior, and Frequency Settings.
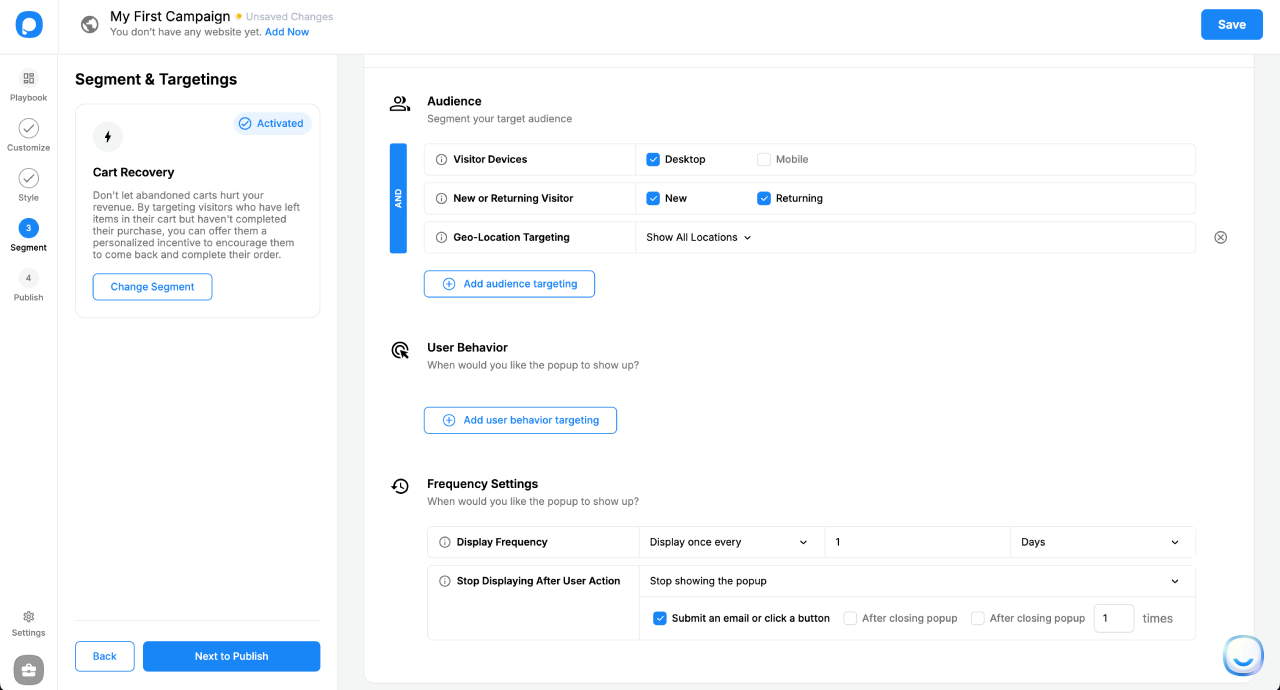
Section 1: Audience
Configure who sees your popup:
- Visitor Devices: Start with Desktop only - exit intent is most reliable on desktop where mouse movement can be tracked
- New/Returning Visitor: Select New visitors only for first-order discounts (returning visitors already know your brand)
- Geo-Location: Leave as "Show All Locations" or limit to countries where you ship
Section 2: User Behavior (Exit Intent)
Note: If your selected template came with pre-configured triggers, remove them first by clicking the X next to each trigger. This ensures you start with a clean slate.
Click Add user behavior targeting and select Exit Intent from the available options:
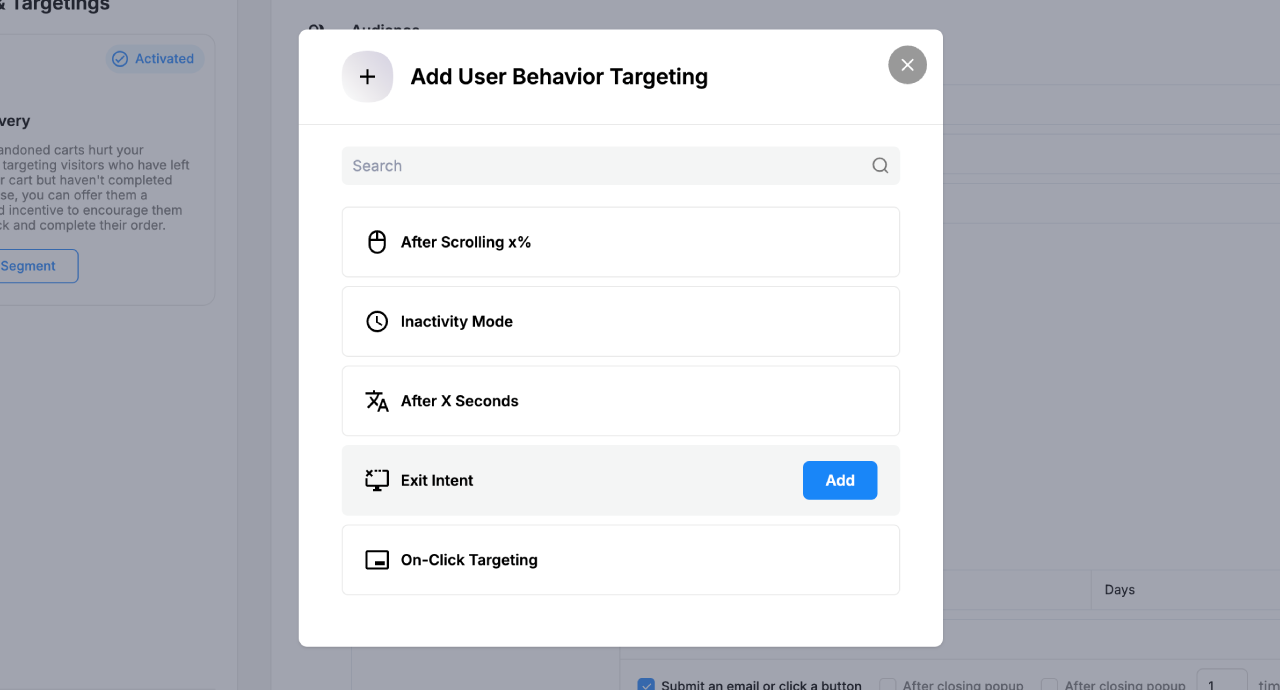
Exit Intent settings:
- Sensitivity: Medium (recommended starting point)
- Low = triggers only on strong exit signals
- Medium = balanced approach
- High = triggers more aggressively (may feel intrusive)
Section 3: Frequency Settings
Control how often visitors see your popup:
- Display Frequency: Set to once every 7 days to prevent annoying repeat displays
- Stop Displaying After User Action: Enable "Submit an email or click a button" so converted visitors don't see it again
Recommended configuration summary:
| Setting | Recommended Value |
|---|---|
| Device | Desktop only (initially) |
| Visitor type | New visitors |
| Trigger | Exit Intent |
| Sensitivity | Medium |
| Frequency | Once every 7 days |
| Stop after action | Enabled |
Step 6: Connect WordPress and Publish
Click Next to Publish to reach the final step. Before you can publish, you need to connect and verify your WordPress site.
Step 6a: Add Your Website
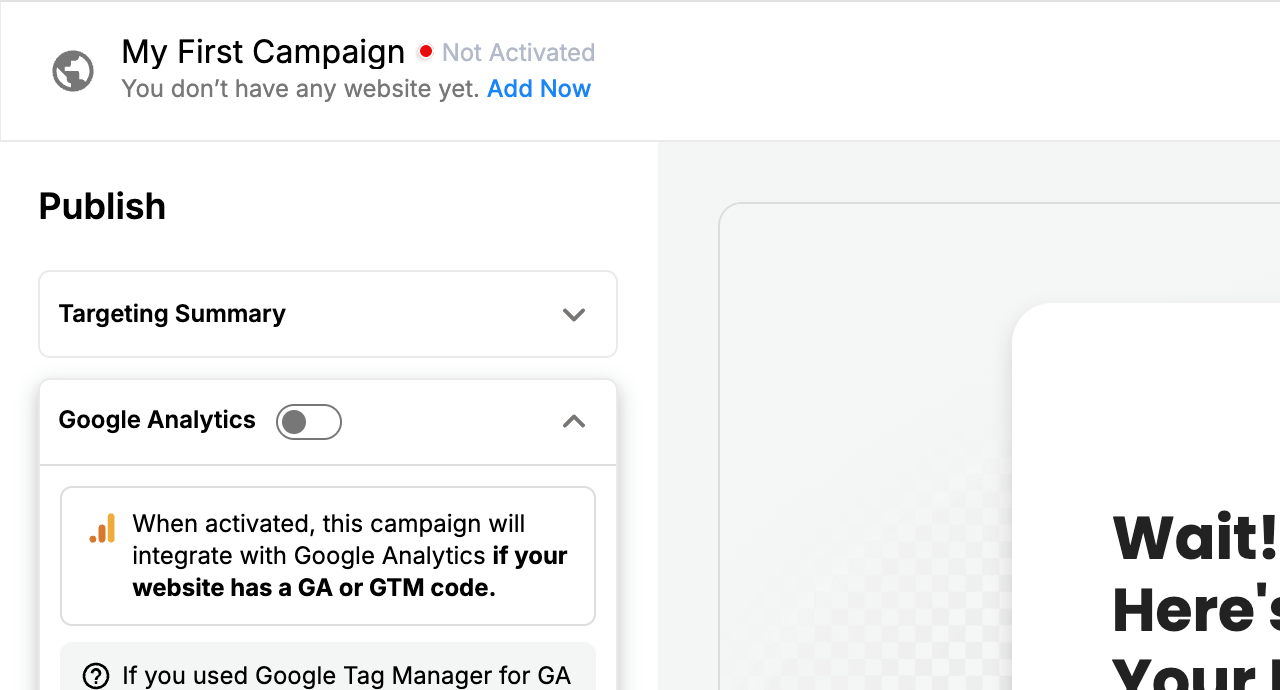
You'll see a message "You don't have any website yet" with an Add now link. Click it to add your WordPress site URL (e.g., https://yourstore.com) and click Add.
Your website will appear in the header, but it won't be verified yet - you'll see a "Not Activated" status.
Step 6b: Install the Popupsmart Code
After adding your website, a verification dialog appears showing "Your website is not verified yet." You have multiple integration options:
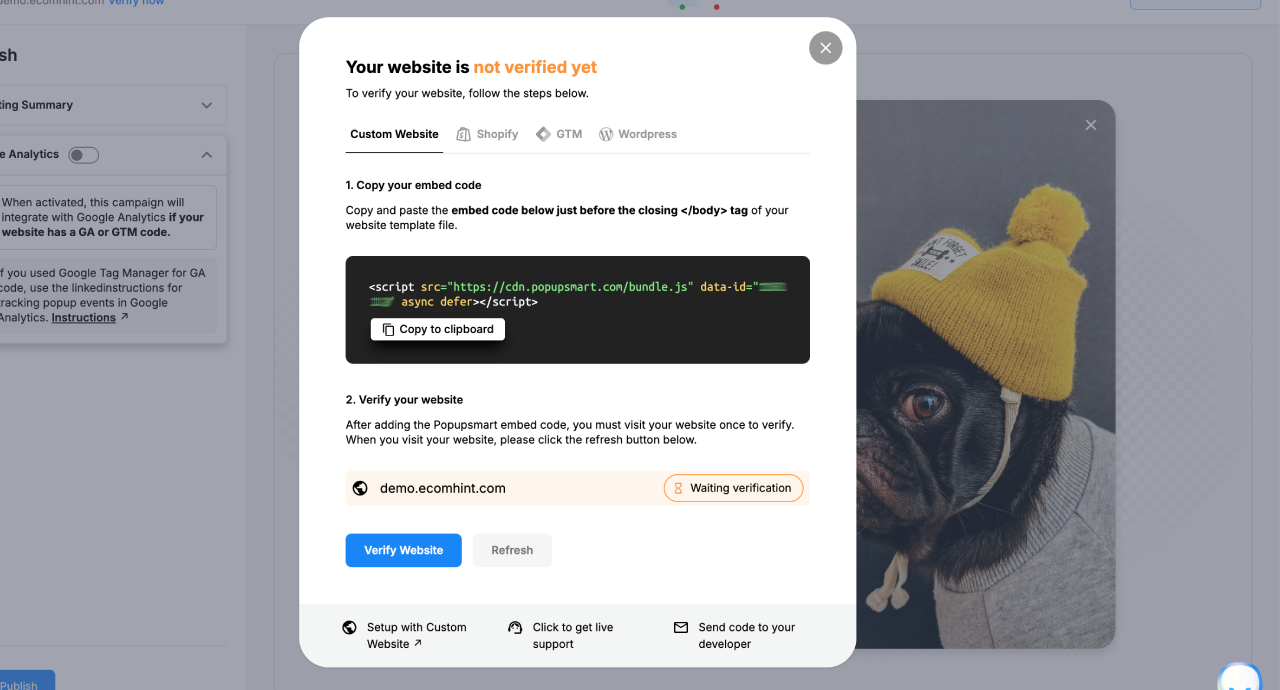
Choose your preferred method:
Option A: WordPress Plugin (Recommended)
- Click the WordPress tab in the verification dialog
- In WordPress admin, go to Plugins > Add New
- Search for "Popupsmart"
- Install and activate the Popupsmart plugin
- Go to Settings > Popupsmart
- Copy your Account ID from the embed code (it's the
data-idvalue in the JavaScript snippet) or find it in Personal Data - Paste the Account ID into the plugin settings and click Save Settings
Option B: Manual JavaScript Installation
- Stay on the Custom Website tab
- Copy the embed code shown (it looks like:
<script src="https://cdn.popupsmart.com/bundle.js" data-id="YOUR_ID" async defer></script>) - In WordPress, go to Appearance > Theme File Editor
- Open
footer.phpand paste the code before the closing</body>tag - Click Update File
Tip: For safer code insertion without editing theme files, use a plugin like "WPCode" or "Insert Headers and Footers."
Step 6c: Verify Your Website
After installing the code:
- Visit your WordPress site in a new browser tab (this triggers verification)
- Return to Popupsmart and click the Verify Website button
- Once verified, your website status will change from "Not Activated" to "Activated" (green dot)
Step 6d: Review and Publish
Once your website is verified, review the Targeting Summary to confirm all your settings are correct:
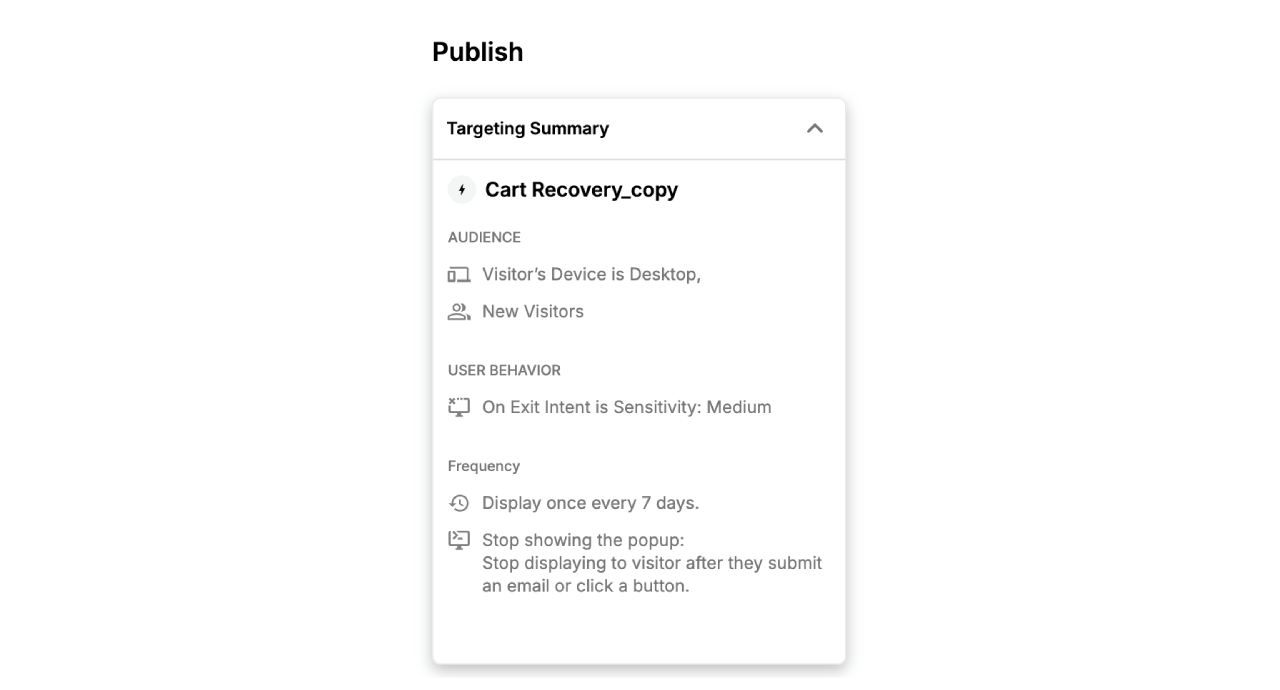
The Targeting Summary shows:
- Audience: Visitor's Device is Desktop, New Visitors
- User Behavior: On Exit Intent is Sensitivity: Medium
- Frequency: Display once every 7 days, Stop showing after they submit an email or click a button
Tip: If your website uses or , you can enable the Google Analytics toggle on the Publish step to track popup performance in your analytics.
Once you've verified everything looks correct, click the blue Publish button in the bottom left corner.
After publishing, you'll see a "Successfully published" confirmation with options to preview your popup live.
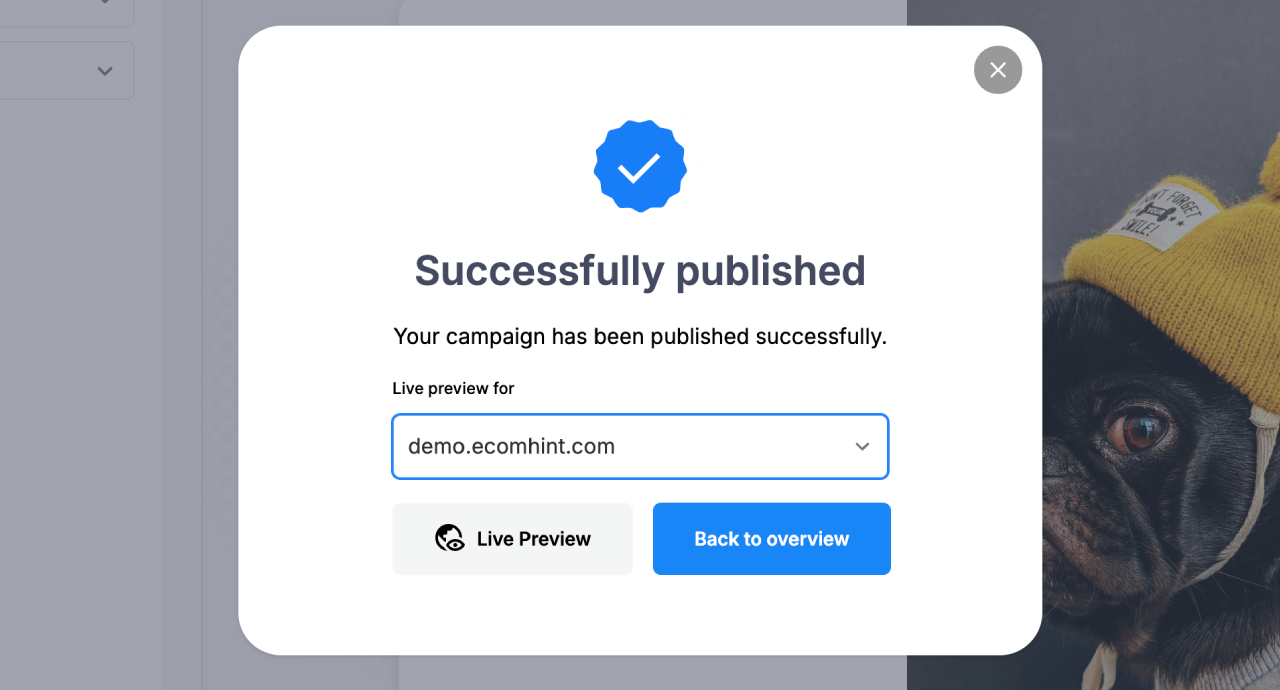
Click Live Preview to see exactly how your popup looks on your actual website. The preview shows your popup overlaid on your site with a blue banner at the top indicating it's preview mode (targeting options are not applied in preview).
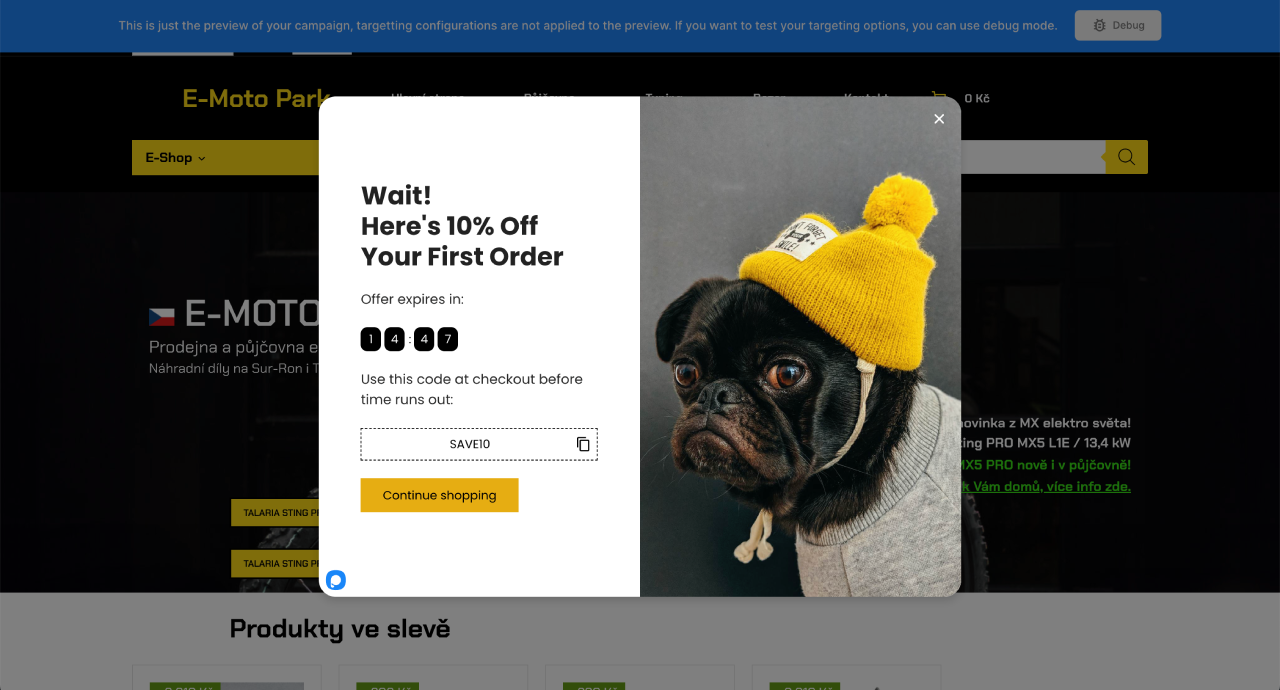
The popup will start appearing on your WordPress site when visitors show exit intent.
Testing Your Exit Intent Popup
After publishing, test your popup to make sure everything works correctly:
- Open your site in an incognito/private browser window (to avoid cookies from previous visits)
- Browse around for a few seconds to simulate normal visitor behavior
- Move your cursor toward the browser's close button or address bar
- The popup should appear with exit intent trigger
- Verify the countdown timer is counting down
- Click the copy icon next to the coupon code to test copying
- Add a product to cart and test the coupon code in checkout
Troubleshooting tips:
| Issue | Solution |
|---|---|
| Popup doesn't appear | Check that your site shows "Activated" (green dot) in Popupsmart dashboard |
| Still not working | Make sure you visited your WordPress site after installing the code, then clicked Verify |
| Plugin not connecting | Verify the Account ID in WordPress Settings > Popupsmart matches your Popupsmart account |
| Popup appears immediately | Check that Exit Intent trigger is selected, not "After X Seconds" |
| Coupon code invalid | Create the coupon in WooCommerce (Marketing > Coupons) with the exact same code |
Pro tip: Use Popupsmart's Debug mode (button next to Publish) to test your popup with different targeting scenarios without affecting real visitors.
Alternative Free Option: Picreel
For sites under 5,000 monthly visitors, Picreel also offers a free plan with exit intent. Like Popupsmart, Picreel uses JavaScript integration. Their video tutorial walks through the WordPress setup:
Exit Intent Popup Best Practices
Design and strategy choices significantly impact conversion rates. A benchmark analysis of 10,000+ campaigns provides insight into what separates high-performers from average results.
Use Countdown Timers Strategically
Popups with countdown timers average 14.41% conversion rate compared to 9.86% without them (Popupsmart). The urgency they create drives faster decision-making. For guidance on when countdown timers help versus hurt conversion, see our guide on FOMO marketing and urgency tactics.
Keep Forms Short
Single-field popups (email only) convert at 5.77% on average. Each additional field reduces this rate because it adds friction to a quick decision.
Offer Genuine Value
Generic "Subscribe to our newsletter" performs worse than specific offers. The most common discount among Shopify stores is 10%, used by 28% of 500 stores studied (Wisepops).
Strong offers:
- 10-15% discount on first order
- Free shipping threshold notification
- Downloadable guide or resource
- Exclusive early access
Write Clear, Direct Copy
You have seconds to communicate value. Every word matters.
Headline formula: [Benefit] + [Specificity]
- "Get 15% Off Your First Order"
- "Wait! Free Shipping on Orders Over $50"
CTA button: Action verbs perform better. "Get My Discount" outperforms "Submit."
Match Brand Voice
Popup tone should feel consistent with your site. A luxury brand's popup differs from a casual lifestyle brand's approach.
Mobile Exit Intent Considerations
Traditional exit intent tracks mouse cursors, which doesn't work on touchscreens. Mobile exit intent uses alternative signals like rapid scroll-up gestures, back button presses, or tab switching.
Google's Mobile Popup Guidelines
Since January 10, 2017, Google has used intrusive interstitials as a ranking signal for mobile search results (Google Search Central).
What gets penalized:
- Popups covering main content immediately after navigating from search
- Standalone interstitials requiring dismissal before content access
- Above-the-fold layouts where the interstitial dominates
What's allowed:
- Legal obligation popups (cookies, age verification)
- Login dialogs for non-publicly-indexable content
- Banners using reasonable screen space that are easily dismissible
- Exit-triggered popups (not on page load)
Key point: The penalty applies only to interstitials shown immediately after clicking from Google mobile search results. Exit-triggered popups that appear later in the user journey are not affected by this specific penalty.
Safe Mobile Approaches
- Trigger on genuine exit signals, not page load
- Use slide-ins or bottom banners instead of full-screen overlays
- Ensure easy dismissal with visible close button
- Consider disabling exit popups on mobile if is a concern
Measuring Exit Popup Performance
Track these metrics to evaluate and improve your campaigns.
Key Metrics
| Metric | Average | Good | Top Performers |
|---|---|---|---|
| Conversion rate | 2-4% | 8-12% | 15-20%+ |
| Display rate | 10-20% | 25-35% | 40%+ |
The top 10% of popup campaigns achieve an average conversion rate of 19.77% (Popupsmart). Reaching this tier typically requires testing and iteration.
What to Track
Conversion rate: Percentage of popup views resulting in the desired action.
Display rate: Percentage of page visitors who see the popup (depends on trigger settings).
Close rate: How quickly visitors dismiss the popup. High close rates with low conversion suggest offer-audience mismatch.
Revenue impact: For discount popups, track actual purchases from popup conversions.
Common Mistakes to Avoid
Triggering Too Aggressively
Popups that trigger from minimal mouse movement feel intrusive. Configure medium-high sensitivity so the popup only appears on clear exit signals.
Offering Weak Incentives
"Subscribe to our newsletter" doesn't give visitors a reason to act. Specific value propositions (discount, resource, exclusive access) perform better.
Using Too Many Form Fields
Every field beyond email reduces conversions. Start minimal and collect additional information through follow-up emails or progressive profiling.
Ignoring Mobile Experience
Exit popups designed for desktop often display poorly on mobile. Test on actual mobile devices, not just browser resizing.
Showing to Existing Customers
Someone who already purchased doesn't need your "first order discount" popup. Use to exclude existing customers.
Skipping A/B Testing
Continuous testing separates average performers from top 10% campaigns. Test headlines, offers, designs, and timing systematically.
Frequently Asked Questions
Do exit intent popups actually work?
Research indicates they do. Exit popups convert around 2-4% of abandoning visitors on average according to data based on 1 billion displays. For cart abandonment specifically, OptiMonk reports an average conversion rate of 17.12%. For a site with 10,000 monthly visitors and 70% leaving without action, even a 3% popup conversion rate captures 210 additional leads or conversions monthly.
Are exit popups bad for SEO?
Exit popups themselves don't inherently harm SEO. However, Google's guidelines penalize mobile interstitials that block content immediately after users arrive from search results. Exit-triggered popups that appear based on user behavior (not on page load) and that don't obstruct the entire screen are generally safe.
What's the best free exit popup plugin for WordPress?
Picreel offers exit intent on its free plan with a 5,000 visitor monthly limit. Popupsmart also provides a free tier with basic features. These options work well for testing exit popups before committing to paid tools.
How often should exit popups show?
Once per session or once per day is typical. Showing the same popup repeatedly damages trust. Use cookies to control frequency and consider showing different offers on subsequent visits.
Can I use exit popups on WooCommerce?
Yes. Most WordPress popup plugins work with WooCommerce. Some (OptinMonster, Popup Maker) have specific WooCommerce integrations for cart-based triggers like "show popup when cart value exceeds $50."
What conversion rate should I aim for?
Start with the average of 2-4% as a baseline. With testing and optimization, 8-12% is achievable for well-targeted campaigns. The top 10% of campaigns reach nearly 20% according to Popupsmart's analysis.
Beyond Popups: The Bigger Picture
Exit popups address one moment in the , but visitors often leave because of friction that happened earlier. Slow page loads, confusing navigation, or unclear product information may push visitors toward the exit before your popup has a chance to help.
Identifying these underlying issues often has more impact than optimizing the popup itself. EcomHint audits your e-commerce site for conversion friction across product pages, cart, and checkout, showing you what to address first.

Jakub is the founder of Ecomhint, an AI-powered ecommerce audit tool focused on UX and conversion optimization. He helps online stores identify friction points across product pages, cart, and checkout using CRO best practices and original research data.
